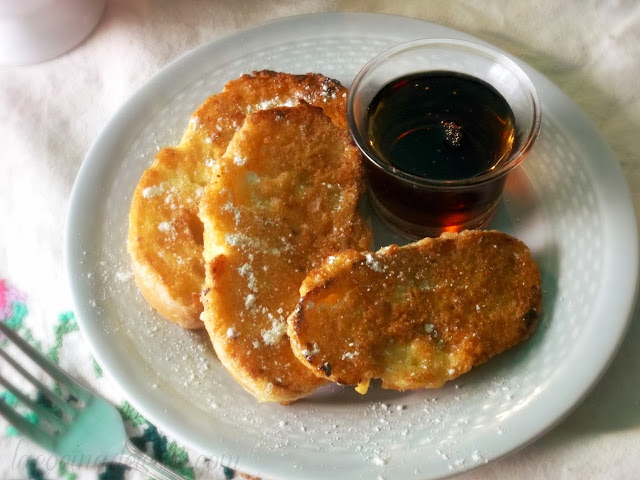
Torrejas {Bolillo Roll French Toast}

Bolillo rolls are probably the most popular bread in Jalisco.  Bolillos, also known as vapor, pan de vapor and birote, are used to prepare tortas, lonches and even capirotada. Fresh Bolillos are available everyday at any local tiendita (small general store).   If you get to the store early enough, you will find that the Bolillos are still warm. One of my favorite ways to use Bolillos is to make TorrejasTorrejas are the Spanish/Mexican version of French Toast.

Bolillo Roll Torrejas (French Toast) - lacocinadeleslie.com

Torrejas
lacocinadeleslie.com

Ingredients:
  • 4 to 6 bolillo rolls
  • 4 eggs
  • 1/4 cup milk or Mexican crema
  • 1 tablespoon sugar
  • 1/4 teaspoon ground cinnamon
  • Butter
  • Ground Cinnamon (garnish)
  • Powdered Sugar (garnish)

Directions:
Slice the bolillo rolls into 1-inch slices. Heat a large skillet or griddle over medium heat. While your skillet is warming, whisk together the eggs, milk, sugar and ground cinnamon, in a small bowl. Dip bolillo slices in egg; coat both sides. Melt a little butter (about 1 tablespoon, but you could use more) in the skillet. Place egg-coated bolillo slices in skillet.  Let cook in butter until golden brown on both sides. Sprinkle Torrejas with powdered sugar and ground cinnamon.  Serve with plenty of maple syrup, honey and/or sweetened condensed milk.  Enjoy!!!

Torrejas (Bolillo Roll French Toast) - lacocinadeleslie.com


Last Minute Turkey Tips


Tomorrow is Thanksgiving, my all-time favorite holiday!  Although, I don't get to celebrate it as I would in the States, the feelings and memories remain.

The main dish that many Americans will be preparing tomorrow is turkey.  I love turkey!  But I didn't always feel that way.

My grandparents never made turkey.  If we didn't spend Thanksgiving with family and friends, we spent it at church.  Some of the turkeys I tasted were very dry and not very tasty.

For my first Thanksgiving as a married woman, I had no idea how to make a turkey.  But I had to learn fast, because my hubby's boss gave all of his employees a turkey for Thanksgiving and Christmas.  I perused every cookbook and magazine I could get my hands on.  All of the recipes looked so pretty, but how to choose the right recipe for my first turkey? 

With so many choices, it was difficult to make a decision.  So I did what anyone in my situation would have done.  I called one of my favortie aunts, who worked in the restaurant business for many years, for some advice.  Aunt Marian was a godsend.  I followed her directions exactly and the result was the best tasting and juiciest turkey I ever had.  It was so good, that friends and family started asking me for advice on how to roast a turkey.  I've shared Aunt Marian's tips with them and now I'm sharing them with you.
  • Start to defrost your turkey 3 days before Thanksgiving.  To do this, place it on the bottom shelf of your refrigerator.
  • Preheat your oven to 475º F.
  • Prepare your stuffing before you rinse your turkey.  The stuffing needs to cool to room temperature before placing it inside the turkey.  Hot stuffing inside a cold turkey leads to a bunch of bacteria that you don't want to mess with!
  • Rinse your turkey, inside and out with cold water.  Pat dry with paper towels.
  • If you are going to stuff your turkey, do so now!
  • Generously brush the turkey with melted butter that has cooled.  You want to brush the butter into every nook and cranny of your turkey!
  • Generously sprinkle salt and pepper all over your turkey.
  • Place turkey in a roasting pan or large baking pan.  Tuck the turkey wings under the turkey.  (This will prevent them from burning.)  Tie the chicken legs together with kitchen twine.
  • Place the roasting pan in the oven.  (If using an aluminum roasting pan, be sure to support the bottom of the pan with both hands or your turkey will end up on the floor.)
  • Bake the turkey at 475º F for an hour or until the turkey has a nice golden brown color all over. 
  • Reduce the oven temperature to 350º F and cover turkey with aluminum foil.  Allow turkey to cook for 20 minutes per pound of turkey. 
  • Remove turkey from oven, but DO NOT remove the aluminum foil cover.  Let the turkey sit for 10 to 15 minutes before serving.
  • Enjoy the juicy, fall-off-the-bone goodness!
Have a very Happy Thanksgiving!

With Love,
Leslie Limon

*Photo courtesy of goodhousekeeping.com

Fresas con Crema (Mexican Strawberries & Cream) and Easy Strawberry Shortcake

Fresas con Crema is a popular Mexican spring and summer dessert made with fresh strawberries, cream cheese, and Mexican crema.

How to make Mexican Fresas con Crema - lacocinadeleslie.com

Strawberries are one of my favorite spring & summer fruits. I find them simply irresistible! As soon as fresh strawberries appear in the market, the first thing my Hubby and kiddies request that I make is Fresas con Crema (Strawberrries & Cream).

Fresas con Crema is a popular dessert here in Mexico. It's said that Fresas con Crema is one of the most common food cravings amongst pregnant women. Fresas con Crema is the equivalent of pickles and ice cream. But way tastier! And you don't actually have to be pregnant to enjoy Fresas con Crema.

Fresas con Crema recipe - lacocinadeleslie.com

Yield: 8 servings

Fresas con Crema

Fresas con Crema (Strawberries & Cream) is an irresistible spring & summer dessert made with cream cheese & Mexican crema.
prep time: 15 MINScook time: total time: 15 mins

ingredients:

2-1/4 lbs. fresh strawberries, thinly sliced
  • 1/3 to 1/2 cup granulated sugar
  • 1/2 teaspoon ground cinnamon 
  • 8 oz. cream cheese, softened 
  • 1-1/4 to 1-1/2 cups Mexican crema, créme fraiche or sour cream 

instructions


  1. Stir together the strawberries, granulated sugar, and ground cinnamon in a medium bowl, just until combined. Let the strawberries macerate in the sugar and cinnamon mixture for about 10 minutes until the sugar dissolves completely and the strawberries have released their juices. 
  2. In a medium bowl, beat the cream cheese and Mexican crema with an electric mixer on low speed for about 30 seconds, just until combined. Increase speed to high and beat for about 2 minutes until nice and creamy. 

  3. Gently fold cream cheese mixture into the strawberries. Cover and refrigerate for at least 2 hours before serving. (If you can wait that long!) Sprinkle with ground cinnamon just before serving. Enjoy! 
Created using The Recipes Generator


------------------------------------------------------------------------------------------

Fresas con Crema is a delicious dessert all on it's own. But as soon as the weather starts to heat up, this gringa starts craving one of her all-time favorite summertime desserts...Strawberry Shortcake! But as much as I love strawberries and whipped cream, I think the combination of strawberries and the cream cheese/Mexican crema mixture I use to make Fresas con Crema makes for an even better Strawberry Shortcake.  

Fresas con Crema Shortcake - lacocinadeleslie.com

Fresas con Crema Shortcake
lacocinadeleslie.com

Ingredients:
  • 2 pounds strawberries, rinsed and sliced
  • 1 cup granulated sugar, divided
  • 1/2 teaspoon ground cinnamon
  • 8 oz. cream cheese, softened  
  • 1-1/2 cups Mexican crema or creme fraiche (I use Lala brand here in Mexico)
  • 1 vanilla pound cake (panque), sliced or cut into bite-size pieces 

Directions:
Combine the strawberries, 2/3 cup of sugar and ground cinnamon in a large bowl. Let sit for about 10 minutes. 

In a medium bowl, cream together the cream cheese, Mexican crema and remaining 1/3 cup of sugar with an electric mixer on medium speed. 

To assemble the Shortcakes, layer a handful of pound cake cubes in a glass, top with 1/3 cup of sliced strawberries and a dollop of the cream cheese mixture. Sprinkle with ground cinnamon. Enjoy!


Pay de Nuez {Pecan Pie}

Just in time for Thanksgiving... Classic pecan pie made with maple sryup in a masa harina crust.


Pay de Nuez (Pecan Pie) - lacocinadeleslie.com

With Thanksgiving just days away I thought now would be as good as time as any to share my recipe for Pecan Pie. For me Pecan Pie is a must at Thanksgiving, along with Pumpkin Pie. Other desserts and pies are more than welcome at our dessert table, just as long as there's also pumpkin and pecan pie.

Burnt Sugar Cake

My second cake with The Cake Slice Baker's is a Burnt Sugar Cake.  I was a little intimidated by the recipe because I have had a couple of burnt sugar disasters.  Well all that is in the past because this cake couldn't have been easier.

The cake was very easy to put together.  So moist and delicious!  Really, the flavor is amazing, like sweet caramel.  And the gorgeous golden color reminds me of butterscotch pudding.

The only problem I had was with the frosting. I don't know if it was the frosting's consistency or my complete lack of cake decorating skills, but it was a little difficult to spread.  A bit thin if you ask me. 

I took this cake to my in-law's home to celebrate my brother-in-law's birthday.  Everyone loved the cake!  The teenagers and younger kiddies all raved about the frosting.

I really like how the cake and frosting taste, but together it seemed a bit overwhelming.  Is there such a thing as too sweet?  I think a Cream Cheese frosting would be really good with this cake.  And the frosting would be great with any Chocolate cake or maybe even an Applesauce cake. (Mmmm!)

Burnt Sugar Cake from Southern Cakes by Nancie McDermott

Cake:

  • 3 cups all purpose flour
  • 1 tablespoon baking powder
  • ½ teaspoon salt
  • 1 teaspoon vanilla extract
  • 1 cup milk
  • 1 cup butter
  • 1¾ cups sugar
  • 4 eggs
  • ½ cup Burnt Sugar Syrup (below)


Burnt Sugar Syrup:

  • 1 cup sugar
  • 1 cup boiling water


Burnt Sugar Frosting:

  • 3¾ cups confectioners sugar
  • ½ cup Burnt Sugar Syrup (above)
  • ¼ cup butter
  • ½ teaspoon vanilla extract
  • 2 to 3 tablespoons evaporated milk or normal milk


Burnt Sugar Syrup:
Heat the sugar in a cast iron skillet or another heavy bottomed pan with high sides. Heat over a medium-low heat, stirring occasionally, until the sugar melts into a clear brown caramel syrup. It should be the colour of tea.


Gradually add the boiling water, pouring it down the sides of the pan so that if the syrup foams and bubbles up, you should be protected.  Continue cooking, stirring often, until the water combines with the syrup and turns a handsome brown syrup. Remove from the heat and set aside to cool. Store the cooled syrup in a sealed jar if not using straight away
.

Cake:
Heat the oven to 350 degrees F. Grease and flour two 9 inch round cake pans.

In a medium bowl, combine the flour, baking powder and salt and stir with a fork to mix well.


Stir the vanilla into the milk.


In a large bowl, beat the butter and the sugar with an electric mixer at high speed for 2 – 3 minutes, until they are well combined. Stop now and then to scrape the bowl down. Add the eggs, one by one, beating well each time.


Pour in half a cup of the burnt sugar syrup and beat well.


Add a third of the flour mixture and about half of the milk, beating at a low speed, until just incorporated. Mix in another third of the flour and the rest of the milk. Finally, add the remaining flour.


Divide the batter between the cake pans and bake at 350F for 20 to 25 minutes until the cakes are golden brown, spring back when touched gently in the centre and begin to pull away from the sides of the pan. Let the cakes cool in the pans on a wire rack for15 minutes. Turn out the cakes into the wire rack to cool completely.


Burnt Sugar Frosting:
In a large bowl, combine the confectioners sugar, the burnt sugar syrup, butter and vanilla. Beat with a mixer at medium speed for 2 to 3 minutes, scraping down the bowl now and then to bring the ingredients together. Add 2 tablespoons of the milk and continue beating until the frosting is thick, soft, smooth and easy to spread. Add a little more sugar if it is thin, and a little more milk if it is too thick.

To Assemble
Place one layer, top side down, on a cake stand or serving plate. Scoop about ¾ cup of the frosting onto the cake. Spread to the edges and place the second cake layer over it, top side down. Frost the sides of the cake, and then the top until it is evenly covered.


Enjoy!!!

With Love,
Leslie Limon

Printable Recipe

International Chocolate Milk Controversy {Chocomil & Licuado de Platano}

I have been wanting to share this recipe with you since I started the Two's-day feature.  But Hubby and I celebrated our 15th wedding anniversary last month and I didn't really want to focus on the cause of our first argument.

Yes, our very first argument as a married couple was over chocolate milk.  Silly, I know, but these things tend to happen when people from different cultures wed.

I don't think we had been married a week when my hubby asked if I would make him a Chocomil (chocolate milk).  I happily waltzed into the kitchen, poured him a glass of milk, added a couple of teaspoons of chocolate milk powder, gave it a stir and served it to my hubby.  My hubby tasted his Chocolate milk, gave me a funny look and innocently asked why I hadn't made him a Chocomil.  I sweetly explained that what he was drinking was in fact a glass of Chocolate milk.  Confused, Hubby shook his head and stated that what I had prepared was most definitely not Chocomil.  This "Yes, it is!"/"No, it's not!" arguing continued for a few minutes.

Hubby tried to explain that Chocomil was made with raw egg.  I just laughed and argued that he could go down the street to Denny's, order a Chocolate milk and that they would serve him the exact same thing that I had just prepared, WITHOUT raw egg!  Finally, Hubby was the voice of reason and explained that American Chocolate milk and Mexican Chocomil weren't the same thing.

Slightly embarrased, I followed Hubby to the kitchen, where he taught me how to make Mexican Chocomil.

Chocomil is a very popular breakfast beverage in Mexico.  Many restaurants offer Chocomil on the menu.  And yes, it is prepared with raw egg.  Mostly made with 2 or 3 quail eggs, but often with regular chicken eggs.

Chocomil

Ingredients:
  • 1 cup milk
  • 1 egg
  • 1 tablespoon chocolate milk powder
  • Ground Cinnamon (for garnish)
Directions:
Place all of the ingredients in a blender cup; cover with lid.  Puree in blender on medium-high speed about 1 minute.  Serve in a cute glass and sprinkle ground cinnamon over the top.  Enjoy!!!

Chocomil


------------------------------------------------------------------------------------------------------------------------


A Licuado is very similar to a Chocomil in its ingredients and preparation.  The only difference is the addition of fruit.  You can add any fruit that you like.  Bananas, strawberries, mango, guava and papaya are the most popular.  And the chocolate milk powder is optional!  I love it in my banana and strawberry Licuados, but not with mango or papaya.

Licuado de Platano
(Banana Smoothie)

Ingredients:
  • 1 cup milk
  • 1 egg
  • 1 tablespoon chocolate milk powder (optional)
  • 1 portion or handful of your favorite fruit  (I used banana)
  • Ground cinnamon
Directions:
Place all of the ingredients in a blender cup; cover.  Puree on medium-high speed for 1 minute.  Pour into glass.  Sprinkle top with ground cinnamon.  Garnish with a slice of fruit.  Enjoy!!!

licuado de platano


Reblog this post [with Zemanta]

Sweet Potato Biscuits

I like to wake up late on Sunday mornings and enjoy a long, leisurely breakfast.  Now that the weather has cooled, I love to have something baking in the oven to help warm the house.  Oven-baked goodies are much better than any old heater!  And in honor of my love of Sunday breakfast, I am adding a new feature.  Every Saturday, I will post a delicious breakfast recipe that I hope you will share (and enjoy) with your family.

A couple of months ago, I mentioned that I bought 6 pounds of sweet potatoes.  I used a few of the camotes (sweet potatoes) to make Sweet Potato fries and other savory dishes.  I steamed the rest of the camotes, scooped out the flesh and froze it in 1 cup portions. 

I still have a couple of baggies of Sweet Potato puree set aside for making pie. But most of it has been used to make Sweet Potato Biscuits.  They are so good! (Sigh!)  Sweet Potato Biscuits are quickly becomming a family favorite.   

Sweet Potato Biscuits

Ingredients:

  • 2 cups flour
  • 1-1/2 teaspoons baking powder
  • 3/4 cup sweet potato puree
  • 1/4 cup brown sugar, packed
  • 1/2 cup melted butter
  • 1/2 cup milk


Directions:
In a small bowl, sift together the flour, baking powder and salt; set aside.


In a large bowl, mix together the sweet potato puree, brown sugar and melted butter until well combined..


Stir in the milk.


Add the flour mixture to the sweet potato mixture.  Mix together until no flour is visible. 

Place dough on lightly floured surface.  Knead for 2 minutes. (Look at the yummy bits of sweet potato peeking through!)
 

Lightly dust rolling pin with flour.  Roll out dough to 1/2 inch thickness.  Cut out desired shape with a 2-inch cookie cutter.  (Do NOT twist cookie cutter!  That prevents the biscuits from rising.)


Place biscuits 1-inch apart on a lightly greased cookie sheet or baking pan.  Bake at 400º F for about 15 minutes or until light golden brown. 


For extra goodness, brush the tops of the biscuits with additional melted butter when removed from the oven.


Enjoy!!!

With Love,
Leslie Limon

Printable Recipe

Sunday Supper {Tostadas & Tortas de Lomo}

Sunday Supper on a Two's-day?  No, I haven't lost my mind.  I've temporarily misplaced it!

All kidding aside, Sunday Supper was actually the inspiration for my Two's-day feature.  It's one recipe served two ways.

Every Sunday, the entire family gathers at my in-law's home for lunch.  All 19 of us!  Lunch in Mexico is the equivalent of American Supper.

Trying to please everyone's likes and dislikes and taking everyone's dietary needs into consideration can't be easy.  The one thing we all agree on is Tostadas de Lomo (Pork Shoulder tostadas).  The ingredients are all prepared ahead of time and no reheating is required.  This recipe is a great way to use any leftover Roast Pork.

I prefer my suegra's Tostadas because they are served at room temperature.  Most restaurants in town serve Tostadas de Lomo very cold.  (Not appetizing at all!)

We don't buy the packaged baked tostadas that are sold in stores.  We buy fried tostadas on a string, called Ensarta de Tostadas.  But use your favorited kind of tostada.


I did say that this is Two's-day. right?  For those that don't want a crunchy tostada, you can enjoy a delicious Torta de Lomo.   A Torta generally refers to a sandwich in Mexico.  But in Jalisco, a Torta is an open-faced sandwich. 


It is prepared on Pan para Tortas (special torta bread).  If you can't find Torta bread, Bolillo works well with this recipe.  (Its what we use when Tortas are sold out.)

And extra bonus is when our cheese lady stops by to sell us the best tasting homemade queso fresco and panela to put on our Tostadas.


For faster and easier assembly, I suggest that you place all of your ingredients together.  This is a great idea for a dinner party.  Set the ingredients up buffet style and let your guests serve themselves.


Tostadas y Tortas de Lomo

Ingredients:
  • 5 pounds pork shoulder roast
  • 1 medium onion
  • 1 clove garlic
  • 1 sprig cilantro
  • 5 pounds tomatoes
  • 1 medium onion, sliced and separated into rings
  • 1 pinch Oregano
  • 3 cups of Cooked Beans (with bean broth)
  • Queso Fresco or Panela (optional)
  • Shredded Cabbage or Lettuce (for garnish)
  • 1 large tomato, sliced
  • Tostadas
  • Pan para tortas or Bolillo rolls

Directions:
Slice the pork shoulder roast in to 1-inch slices.  Place in large stockpot with the medium onion, garlic clove, and sprig of cilantro.  Cover with water.  Season with salt; cover and simmer over medium heat until meat is very tender.  (Between 2 and 3 hours.)  Shred the meat when it is done cooking.


In another large stockpot, fill with the tomatoes and cover with water. Cook over medium heat until the tomatoes are fully cooked.  Puree the tomatoes in a blender, about 1 cup of the cooking water.  Add more of the cooking water if your salsa is too thick.  Season with salt.  Add the onion rings and the pinch of Oregano.  Set aside.


In a small saucepan, heat the cooked beans.  Puree the beans in a blender until smooth and spreadable.  If mixture is too thick, add 1/4 cup of bean broth or water.

Gather all of your ingredients to make assembling the tostadas much easier.

To assemble the tostadas, spread desired amount of pureed beans on tostada.


Crumble queso fresco over beans. (Optional)


Top the queso fresco with shredded pork.


Top with shredded cabbage or lettuce.


Spoon tomato salsa over tostada.


Garnish with a slice of tomato.


For the torta, slice torta bread or bolillo roll in half lengthwise.  Assemble as you would the tostada.


Enjoy!!!


With Love,
Leslie Limon